Graylog
What is Graylog?
Graylog is defined in terms of log management platform for collecting, indexing, and analyzing both structured and unstructured data from almost any source.
Why do we need Graylog?
Nowadays most of the applications following microservice architecture .where many of microservices are hosted on different machines. So, it will take very huge time for the user to get the logs from each microservice on different machines every time.
To avoid this we have an application called Graylog .which works by configuring at one place and get the logs of all microservices at one centralized location.
Is it Paid software?
No, Its Open source log management tool.
How it works?
Architecture:
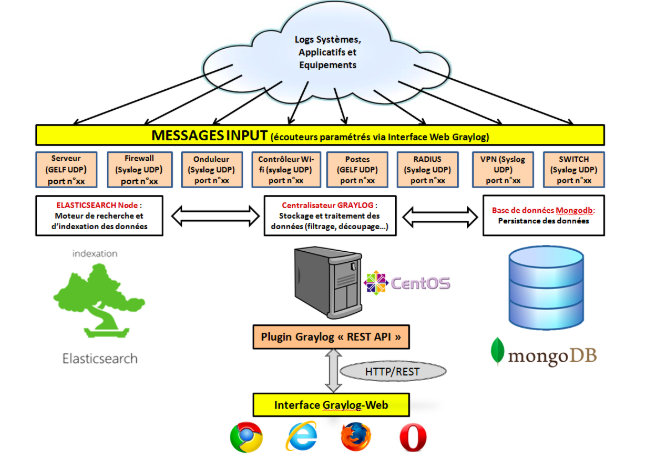
As illustrated in the above diagram, the following are the components –
1.Elasticsearch
2.MongoDB
3.Graylog
- ElasticSearch: ElasticSearch is useful for storing logs and searching text.
- MongoDB: MongoDB is useful for Metadata Management.
- Graylog: Graylog can help you to better understand the use made within your applications, improve their security, and reduce costs.
Architectural Considerations:
There are a few rules of thumb when scaling resources for Graylog:
- graylog-server nodes should have a focus on CPU power.
- Elasticsearch nodes should have as much RAM as possible and the fastest disks you can get. Everything depends on I/O speed here.
- MongoDB is only being used to store configuration and the dead letter messages and can be sized fairly small.
- graylog-web-interface nodes are mostly waiting for HTTP answers of the rest of the system and can also be rather small.
- graylog-radio nodes act as workers. They don’t know each other and you can shut them down at any point in time without changing the cluster state at all.
Also, keep in mind that messages are only stored in Elasticsearch. If you have data loss on Elasticsearch, the messages are gone — except if you have created backups of the indices.
MongoDB is only storing meta information and will be abstracted with a general database layer in future versions. This will allow you to use other databases like MySQL instead
How to Install and Configure graylog with easy steps?
Usually, graylog will be supporting for below of the platforms
- Ubuntu 12.04, 14.04, 16.04
- Debian 7, 8, 9
- RHEL/CentOS 6, 7
Let us refer to install graylog for CentOS
Note, if we need to install for other OS levels please refer this http://docs.graylog.org/en/2.4/
Prerequisites:
Make sure to install and configure the following software before installing and starting any Graylog services:
- Java (>= 8)
- MongoDB (>= 2.4)
- Elasticsearch (>= 2.x)
Let’s start with installing Java
$ sudo yum install java-1.8.0-openjdk-headless.x86_64
If you want to use pwgen later on you need to Setup EPEL on your system with sudo yum install epel-release and install the package with
$ sudo yum install pwgen
How to add MongoDB?
Before installing the MongoDB First add the below content to repository file /etc/yum.repos.d/mongodb-org-3.6.repo
[mongodb-org-3.6]
name=MongoDB Repository
baseurl=https://repo.mongodb.org/yum/redhat/$releasever/mongodb-org/3.6/x86_64/
gpgcheck=1
enabled=1
gpgkey=https://www.mongodb.org/static/pgp/server-3.6.asc
After that, install the latest release of MongoDB with
$ sudo yum install -y mongodb-org
Additionally, run these last steps to start MongoDB during the operating system’s boot and start it right away:
$ sudo chkconfig — add mongod
$ sudo systemctl daemon-reload
$ sudo systemctl enable mongod.service
$ sudo systemctl start mongod.service
How to Start Elasticsearch?
First, install the Elastic GPG key with
rpm — import https://artifacts.elastic.co/GPG-KEY-elasticsearch. then add the repository file /etc/yum.repos.d/elasticsearch.repo with the following contents:
[elasticsearch-5.x]
name=Elasticsearch repository for 5.x packages
baseurl=https://artifacts.elastic.co/packages/5.x/yum
gpgcheck=1
gpgkey=https://artifacts.elastic.co/GPG-KEY-elasticsearch
enabled=1
autorefresh=1
type=rpm-md
followed by the installation of the latest release with
$ sudo yum install elasticsearch.
Make sure to modify the Elasticsearch configuration file (/etc/elasticsearch/elasticsearch.yml) and set the cluster name to graylog additionally you need to uncomment (remove the # as the first character) the line:
cluster.name: graylog
After you have modified the configuration, you can start Elasticsearch:
$ sudo chkconfig — add elasticsearch
$ sudo systemctl daemon-reload
$ sudo systemctl enable elasticsearch.service
$ sudo systemctl restart elasticsearch.service
How to configure Graylog server?
Now install the Graylog repository configuration and Graylog itself with the following commands:
$ sudo rpm -Uvh https://packages.graylog2.org/repo/packages/graylog-2.4-repository_latest.rpm
$ sudo yum install graylog-server
Follow the instructions in your /etc/graylog/server/server.conf and add password_secret and root_password_sha2. These settings are mandatory and without them, Graylog will not start!
You need to use the following command to create your root_password_sha2:
echo -n yourpassword | sha256sum
To be able to connect to Graylog you should set rest_listen_uri and web_listen_uri to the public host name or a public IP address of the machine you can connect to.
The last step is to enable Graylog during the operating system’s startup
$ sudo chkconfig — add graylog-server
$ sudo systemctl daemon-reload
$ sudo systemctl enable graylog-server.service
$ sudo systemctl start graylog-server.service
What is collector sidecar in graylog?
Graylog Collector Sidecar is a lightweight configuration management system for different log collectors, also called Backends. The Graylog node(s) act as a centralized hub containing the configurations of log collectors.
How to add collector sidecar on the client side?
Its very simple just add the RPM package for centos
$ sudo rpm -i collector-sidecar-0.0.9-1.x86_64.rpm
Activate the Sidecar as a system service:
$ sudo graylog-collector-sidecar -service install
$ sudo systemctl start collector-sidecar
After Installing the collector sidecar just complete the configuration by
/etc/graylog/collector-sidecar/collector_sidecar.yml
| Server_url | URL to the Graylog API, e.g. http://127.0.0.1:9000/api/ which is same as your rest listen URL |
| node_id | Name of the Sidecar instance, will also show up in the web interface. Hostname will be used if not set. |
| collector_id | Unique ID (UUID) of the instance. This can be a string or a path to an ID file |
| log_path | A path to a directory where the Sidecar can store the output of each running collector backend |
| tags | List of configuration tags. All configurations on the server side that match the tag list will be fetched and merged by this instance |
| backends | A list of collector backends the user wants to run on the target host |
Finally, we are done with the configuration.
How do we launch graylog?
- Open your favourite browser and hit the URL which you mentioned as web_listen_uri i.e http://127.0.0.1:9000
- Enter the username and password as per the configuration
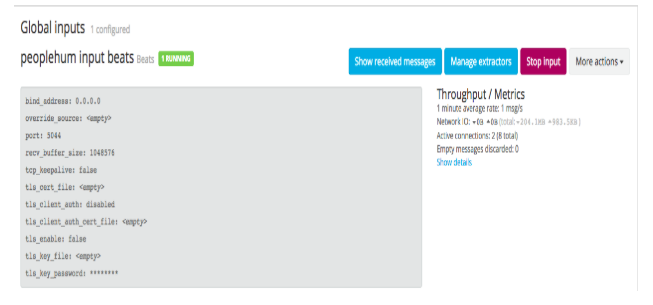
- Go to System/Inputs and create the global inputs to start the process.
For example
- Go to System/Collectors click on your collector and make sure your collector which is hosted in your client side should be up and running

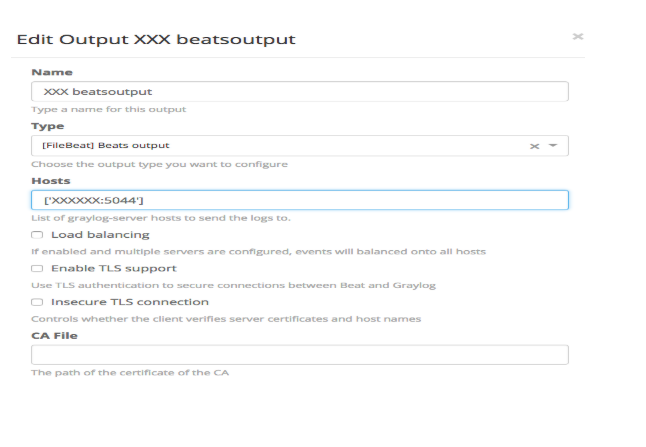
- Create configuration of filebeat by creating the output and Input of the microservice by specifying the log path to retrieve the log messages
- Output filebeat example
- Input Filebeat example
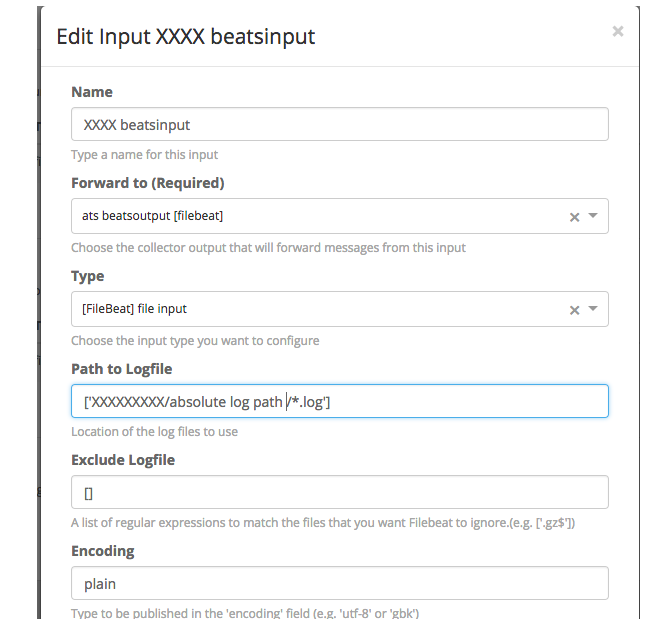
Now all is yours to set up the Input-output messages from the frontend of Graylog and get the log messages.
To be continued to set up the Streams on Each microservice…
- Diagramatic References-
http://docs.graylog.org/en/2.4/pages/architecture.html
http://docs.graylog.org/en/2.4/pages/collector_sidecar.html
Written by-
Goutham R
QA Team
www.peoplehum.com
Also published on Medium.